Create tiles in 10 easy steps!
Well, I'm just making this because I know some people don't know how the heck to make one.
This should hopefully answer all your questions about Tilesets.
What is a tileset?
Well, a tileset is textures that can be used for a game.
For example, the brick block is Super Mario Bros. is a texture on a 16x16 2D square.
How do I make a tileset?
It is a pretty easy process to understand. I'll show you how it's done.
1. Download a image-editing program. In this example, I will be using Paint.NET, a simple but yet advanced tool for editing photos.
You can download it from here: http://www.getpaint.net/download.html
2. When you open Paint.NET, you will be presented with a open canvas. This isn't what you want for making a tileset. Instead, go to File, then New...
3. In the dialog box, make the width and height of the canvas, 17x17, like this:

Then just click OK.
4. You will now have a tiny canvas. You may want to zoom in using the Magnifying Glass tool, located to the left.
Now, click on the Eraser. Change the size in the bar above, to something above 20, and click on the canvas. The image will now have gray-and-white dots. This is transparency, which is basically invisibility. This means instead of showing the color White, it will show nothing whatsoever.
5. Click on the Pencil tool, and select your desired color in the bottom-left corner. Then, just draw/create your tile.
But, you can only draw on this section of the tile:

Sorry for a image that takes up half the universe.
This is due to the configuration settings that go on the right side of the tile.
If you are wondering why you can't draw on the bottom, this is because the tile would be 16x17. That wouldn't make any sense at all, wouldn't it?
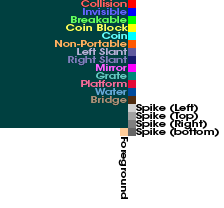
6. After you are finished with your tile, it's time to configure it.
To make it simple, use this image:

Please note the image is not mine.
You can also use this for when SE (Special Edition) is released. It was created by Superjustinbros

Thanks for WillWare pointing out it dosen't matter what color they are, but it just matters they are in the correct place.
7. Once you have configured your tile, and created it, it's time to Save it.
Just click File, and then Save...
Then save anywhere you like, for example, the Desktop.
Make sure you save it as a .png, which you can change it to that file format below where you name your file.
Then, press Save, and then press OK on the other dialog box that appears.
8. Now, how do you insert the tiles ingame? Well, it's simple.
UNIVERSAL:
Open Mari0, go the to mappack selection screen, and then press "M" on your keyboard. Next, open the "mappacks" folder, and open the folder to the mappack you would like the custom tiles to be added to.
WINDOWS XP USERS:
Press Start, click Run, and type "%appdata%" WITHOUT the quotes, and hit Enter.
Then navigate to LOVE, mari0, mappacks, and then select the mappack you would like the custom tiles to be added to.
WINDOWS VISTA/7 USERS:
Press Start (Start Orb), and type %appdata%, and click on the Roaming folder.
Then navigate to LOVE, mari0, mappacks, and then select the mappack you would like the custom tiles to be added to.
WINDOWS 8 USERS:
Press WINDOWS KEY + R on your keyboard, type %appdata%, and then press Enter. Next, navigate to LOVE/mari0/mappacks, and then select the mappack you would like the custom tiles to be added to.
You can also open Mari0, go to Mappacks, and press "M" on your keyboard to open the mappack folder.
9. Once you have navigated to the mappack you want, Copy and Paste the tile into your mappack folder (Not the mappack folder, but the mappack INSIDE the mappack folder you'd like to add the tile to.), and rename it to "tiles.png". The ".png" extension is not needed, UNLESS you have file extensions shown.
10. Open up Mari0, select your mappack, go to Level Editor, hit ESC, and go to Tiles, and click Custom, and there is your tile!
Congratulations, you have created your first tile for use with Mari0! :D
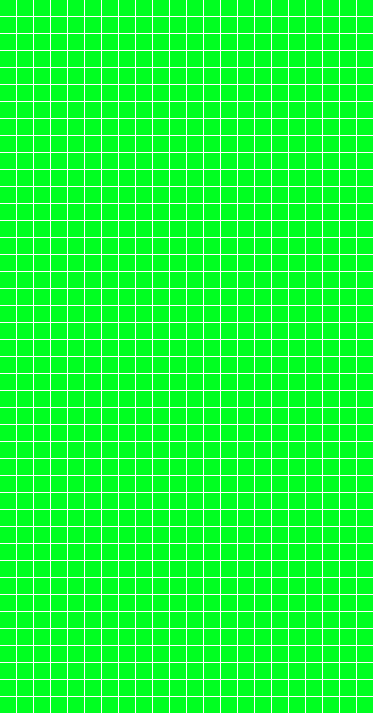
If you want to further expand and add more tiles, then I suggest using this template, created by Mr.Q.Marx:

To save the image, right click, and hit Save Image As...
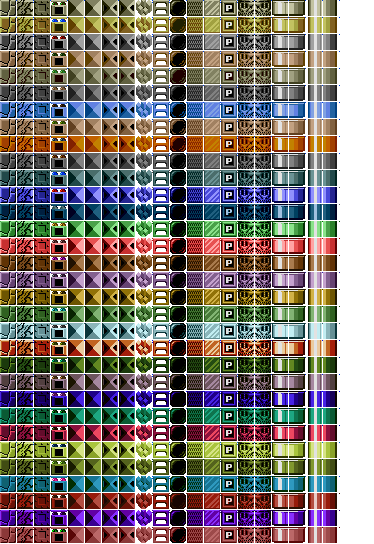
You can also use this template, created by Superjustinbros:
If that dosen't work, you can use Qcode's, which is the maximum amount for some computers:Superjustinbros wrote:Here's a template that allows a lot more room.
Tiles go in the green squares, the white areas are the boundaries where the tile properties are configured.
Or, you can use this template that QwertymanO07 made for Special Edition.Qcode wrote:
Some computers cannot display images > 512 px. This is the most tiles you can have that will be compatible on all computers.


I suggest posting them on this thread:
viewtopic.php?f=12&t=2437
To post them there, just upload the tile/tileset to Imgur:
http://imgur.com/
After you uploaded it, click on the picture, and Copy the URL, which should look something like this:
Code: Select all
http://i.imgur.com/RANDOMCODEHERECode: Select all
[img]http://i.imgur.com/RANDOMCODEHERE[/img]Anyways, I hope you enjoyed the tutorial.
If you have any questions, feel free to ask. I wont bite. :)
Hopefully I wont bite. :P
Single Tile Sample

Created by lolpoop89
Multiple Tiles Sample

Recreated by TheSeek
Massive Tileset Sample
Created by Superjustinbros