
Hello, I'm MrCytosine, and I'm writing this because I'm sick and tired of having to reply to people to tell them how to set up a thread properly. Now this message won't be perfect because I'm writing and finishing it in one session. This fact also applies to mappack threads, but there are ways to do a pretty good job of setting it up first time. Trust me, it'll help increase the amount of downloads of your mappack. Sure, it's 10 times quicker to slap your keyboard frantically and create a thread in a minute, but by setting up your thread poorly from the start, you're only hurting yourself.
For mappacks that are very early in development, this message holds less relevance, but that doesn't mean you can just put up a download link, and that's it. Please note that this message is only a guide (basically my opinion) to creating a reasonable thread, and it should only be treated as such. You should note that there are other sites and software out there that may be more tailored to your needs that work in a similar sort of way, so don't fret if you don't enjoy using the stuff I use in this message. I will not be telling you how to install the software, because this message is going to be long enough as it is.
All of the screenshots and tutorials were made on a PC running Windows 7, but it should be pretty similar for previous versions. If you own a Mac, I'm sorry, I can't really help you there. Maybe someone else could help me construct another thread for Mac users.
Also, don't ignore this so people yell at you and constantly bump the thread to the top. People absolutely hate it when they go onto a recently bumped thread, only to see it say "Screenshots!".
Well, to quote Mario, "HERE WE GOOOOO!"
Your description is really important, as it'll will give potential downloaders a brief impression of what they're getting into, it should be fairly short, maybe between 2 and 8 lines. No one wants to read 10 minutes of waffling. Try to describe the general feel of the mappack, what you hope to achieve with the rest of it (if it isn't finished), and what makes your mappack interesting to play (maybe it's funny, it has a badass custom tileset etc.). Make it your own, people. You want to show off your mappack as best as possible, so try and make a good first impression.
You should also compress your mappack, as it reduces the size of the mappack, reducing download time. Try to compress your mappack in both filetypes; .zip and .rar. I personally use WinRAR (although WinZIP and 7-Zip are available) as it allows you to compress files to either filetype quickly and easily. I shall now give an illustrated tutorial on how to use WinRAR to archive files in either format:
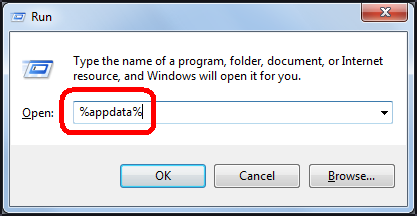
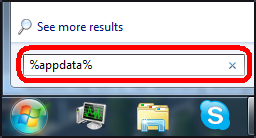
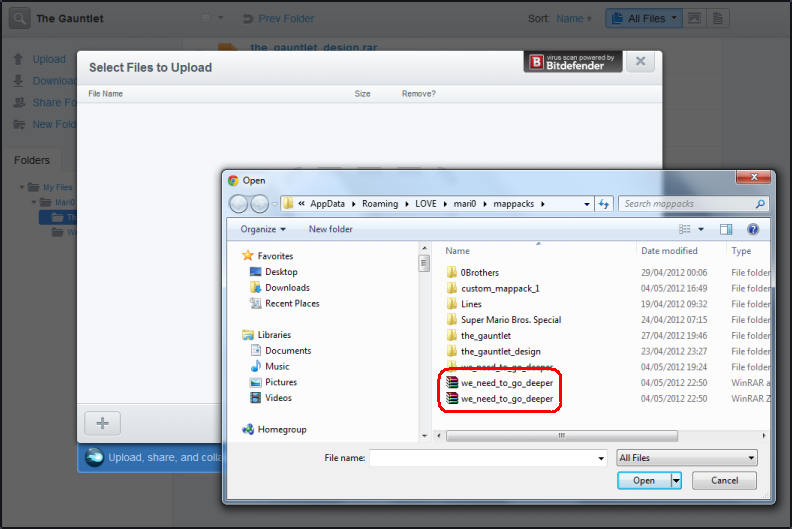
Step 1: Firstly, you need to find the location of your mappack so you can archive it. You can do this by either searching for %appdata% via the Run application, or by searching it in the Start menu. After this, go to the LOVE folder, then mari0, then mappacks. The mappack you wish to archive will be in this folder (thanks Cheese for reminding me that this step should be here).

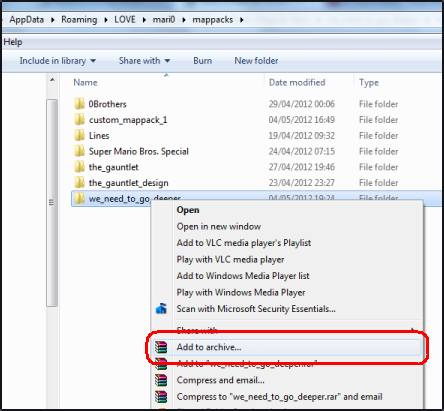
Step 2: Select the file you wish to archive (try to archive the entire mappack folder, as it makes it easier when you are extracting the folder).
Step 3: Right click on it, and select "Add to archive...".
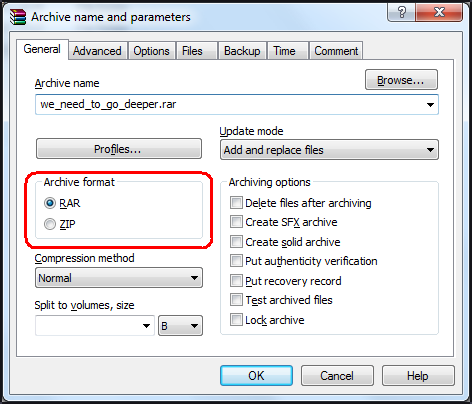
Step 4: Select the archive format you want, and then click Ok.
Step 5: When you have done this, you should get 2 archives. It's a good idea to keep track of which archive is which filetype. You can do this by setting up your files and folders to display as details, or by single clicking on the archive, and looking at its properties at the bottom of the screen.

Step 1: Firstly, you need to find the location of your mappack so you can archive it. You can do this by either searching for %appdata% via the Run application, or by searching it in the Start menu. After this, go to the LOVE folder, then mari0, then mappacks. The mappack you wish to archive will be in this folder (thanks Cheese for reminding me that this step should be here).
Step 2: Select the file you wish to archive (try to archive the entire mappack folder, as it makes it easier when you are extracting the folder).
Step 3: Right click on it, and select "Add to archive...".
Step 4: Select the archive format you want, and then click Ok.
Step 5: When you have done this, you should get 2 archives. It's a good idea to keep track of which archive is which filetype. You can do this by setting up your files and folders to display as details, or by single clicking on the archive, and looking at its properties at the bottom of the screen.
This is a necessary part, because a file uploading site is the link between Mari0 players and your mappack. Actually, it's kind of surprising how other people screw up other parts so catastrophically, when this part is arguably the hardest to get right. Anyways, lets get on with the tutorial. For this, I'm using MediaFire as my file uploading site (although there are other alternatives, such as HulkShare and RapidShare).
Step 1: Select the file via your chosen site. You need to click the upload button, and find your file in your PC directory.
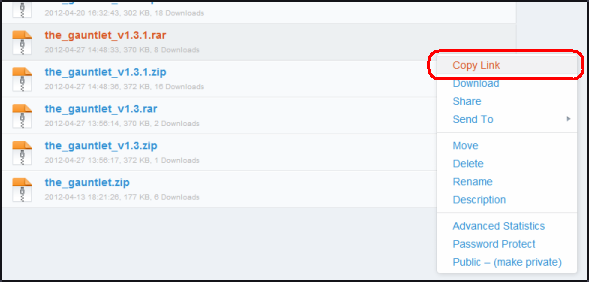
Step 2: When you have uploaded your file, copy the link of the file.
Step 1: Select the file via your chosen site. You need to click the upload button, and find your file in your PC directory.
Step 2: When you have uploaded your file, copy the link of the file.
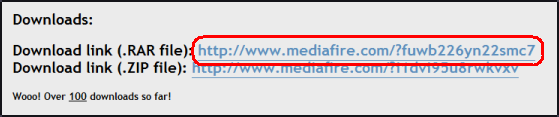
Step 1: In the Mappack thread of the forum, create a new thread, and in the editor, click the URL button. Then, paste the URL of your file between the URL tags.
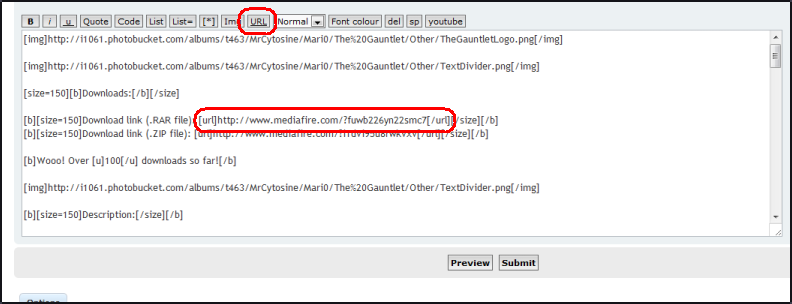
Step 2: Preview your thread by clicking the preview button underneath the editor, and make sure your link is working. It should look like your average link.
If it were me, I would make them in larger text, because it makes it easier to see. Either make it visible when the page instantly loads (pretty close to the top), or have them located right at the very bottom of your first post. Personally, I prefer the second option, because it encourages people to read the entire post, and reduces the chance of people asking stupid questions that could be answered with 10 seconds of reading.
Now don't go clicking the submit button yet, there's still a couple of things you need to do to get your thread to an acceptable standard, such as:
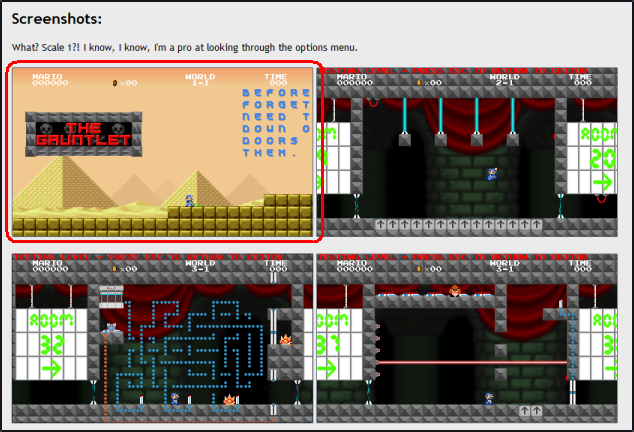
Through my own experience, this is the most common fault with many mappack threads. If I got £1 for every time someone said "Screenshots" as the first reply to any mappack thread, I'd probably have around... £12. This bit is kind of crucial, as people need to see evidence of a good bit of work before they go downloading your pride and joy.
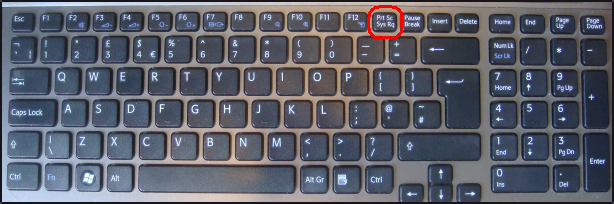
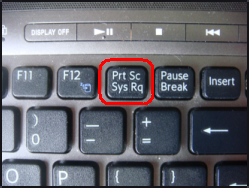
Step 1: You need to find the actual "Print Screen" button on your keyboard (on some Spanish keyboards, it may be called "Impr Pant" or "IMP PNT"). This button allows you to take a picture of whatever is on the screen. It is not necessary to use any software to do this, as some pieces of software require you to click on another window to take a picture, which pauses the game. It's what has allowed me to put up these step by step pictures. The button is present on all modern keyboards, and it's around the top of the keyboard, and slightly to the right. It should say "Prt Sc" on it, or something similar:
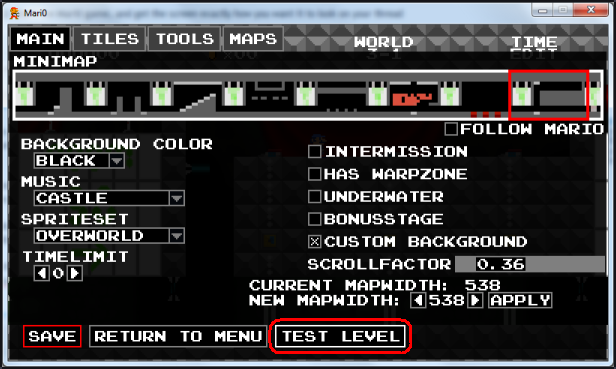
Step 2: Start the Mari0 game, and get the screen exactly how you want it to look on your thread. It's usually a good idea to do this in the "Test Level" mode of the Mari0 editor. Remember, you want to show off your mappack, so try to take screenshots of the best bits. Please, for the love of god, make your screen dimensions ratio 1 or 2, preferably 1. The image doesn't have to take up the entire screen.
Step 3: Press the Print Screen button. Alternatively, you can hold down the Alt Key, and then press Prt Sc. This allows you to take a snapshot of the current window you're in.
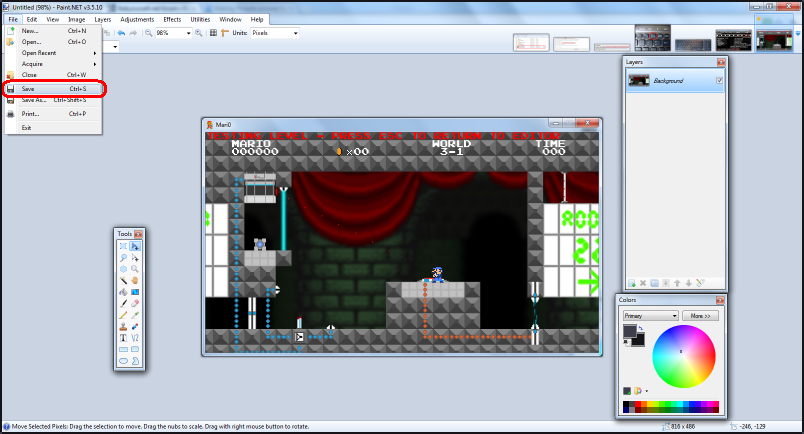
Step 4: Paste your screenshot onto a image editing program (I use Paint.NET, but you can use alternatives, such as MS Paint or Gimp). Then save your screenshot (I would recommend saving it as a .png file, as it keeps the screenshot quality the same).
Step 1: You need to find the actual "Print Screen" button on your keyboard (on some Spanish keyboards, it may be called "Impr Pant" or "IMP PNT"). This button allows you to take a picture of whatever is on the screen. It is not necessary to use any software to do this, as some pieces of software require you to click on another window to take a picture, which pauses the game. It's what has allowed me to put up these step by step pictures. The button is present on all modern keyboards, and it's around the top of the keyboard, and slightly to the right. It should say "Prt Sc" on it, or something similar:
Step 2: Start the Mari0 game, and get the screen exactly how you want it to look on your thread. It's usually a good idea to do this in the "Test Level" mode of the Mari0 editor. Remember, you want to show off your mappack, so try to take screenshots of the best bits. Please, for the love of god, make your screen dimensions ratio 1 or 2, preferably 1. The image doesn't have to take up the entire screen.
Step 3: Press the Print Screen button. Alternatively, you can hold down the Alt Key, and then press Prt Sc. This allows you to take a snapshot of the current window you're in.
Step 4: Paste your screenshot onto a image editing program (I use Paint.NET, but you can use alternatives, such as MS Paint or Gimp). Then save your screenshot (I would recommend saving it as a .png file, as it keeps the screenshot quality the same).
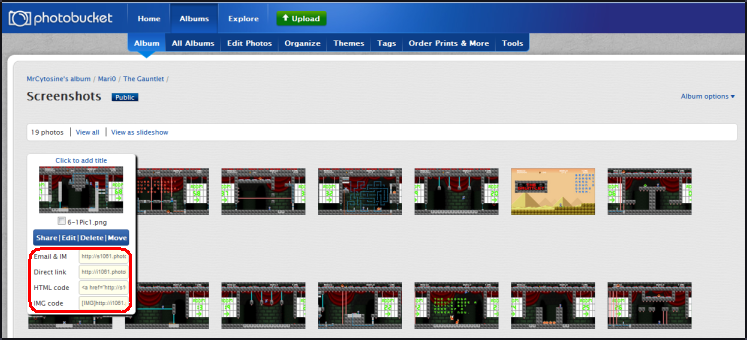
Like your file sharing site, your photo uploading site is the middle man between Mari0 players and your screenshots. The process is similar to uploading files, too. I personally use photobucket, but there are alternatives (e.g. Flickr, Tinypic and Imgur).
Step 1: Select the photo via your chosen site. You need to click the upload button, and find your file in your PC directory.
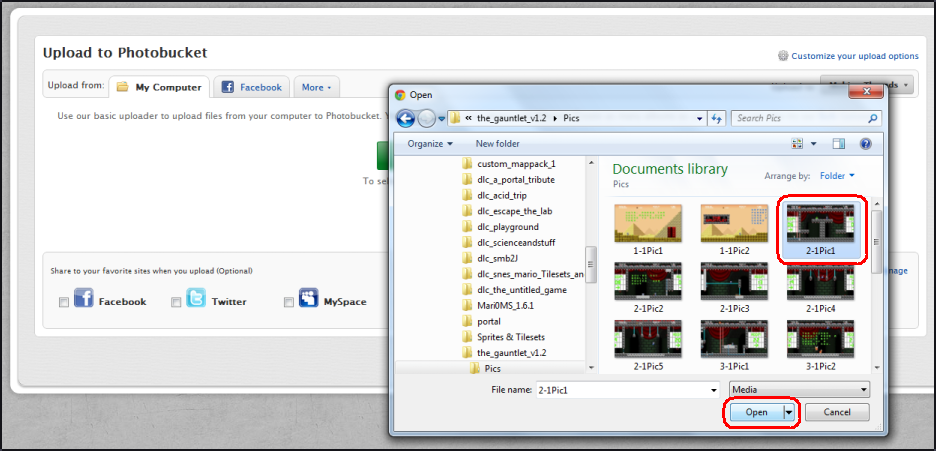
Step 2: When you have uploaded your file, copy the link of the file.
Step 1: Select the photo via your chosen site. You need to click the upload button, and find your file in your PC directory.
Step 2: When you have uploaded your file, copy the link of the file.
Step 1: In your thread, click the Img button. Then, paste the URL of your image between the Img tags.
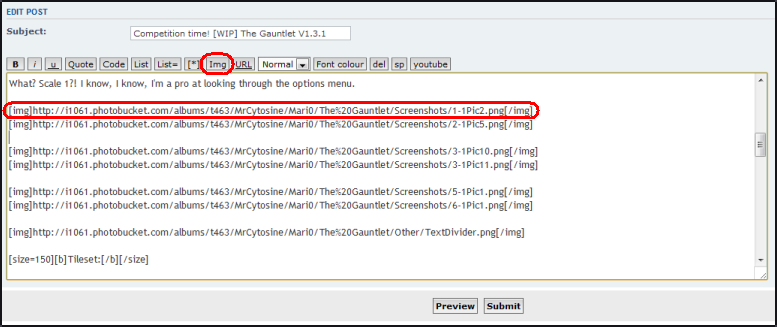
Step 2: Preview your thread by clicking the preview button underneath the editor, and make sure your photo is working. It should look exactly like your screenshot.
Step 2: Preview your thread by clicking the preview button underneath the editor, and make sure your photo is working. It should look exactly like your screenshot.
If you've made it this far, congratulations! You are now part of I'd say around 15% of people who, in my opinion, know that they're doing with a thread. Give yourself a pat on the back, eat some chocolate, stab yourself, I don't care what you do to celebrate, because it ain't my business. At this point, you can upload your thread, and people won't yell at you.
Here, you deserve this:

(I've been waiting ages for an excuse to use that image)
However, there are other things you can do to further improve your thread, such as:
Here, you deserve this:
(I've been waiting ages for an excuse to use that image)
However, there are other things you can do to further improve your thread, such as:
Title Image - If you can make a picture to help display what it's called and what it's all about, people get a better impression of what they're getting into.
Tileset - If you're using a custom tileset to make this mappack, and only if you really want to release it, you can put an image of your tileset on your thread, in a similar sort of way to screenshots.
Version History - If you haven't made the mappack and finished it in one go, you can go create a version history for every update of your mappack. It gives the impression to others that you're dedicated to your mappack, and it'll be improved constantly. You may also wish to put up download links to outdated versions if you so desire.
Trailers - Now this is for advanced mappack makers. If you can get a decent trailer made, it will really help to show off your mappack, as it combines sound, animation, and anything else you want to throw in there. There are a couple of people in the forums who could help you make a trailer. I won't list them here, because I'm fairly sure they don't want to be bombarded with thousands of requests. Just go search a little.
Help Meeee! - If you're really stuck with an idea or a mechanic, you can post a "Things I Need Help With" section in your thread. Don't worry, the people in this forum aren't jerks, someone will help you (unless you're working on The Gauntlet, then you're screwed for help).
Page Breakers - You can also put in a really thin image of a line across the page, to help divide the sections of text up (I've done it for this thread using the page breakers I used for the Gauntlet). Really, its only purposes are to make your thread look sexy, and to improve readability, so it's not completely necessary.
Resized Windows - Another thing you can do is to resize your Mari0 window dimensions. This is helpful if you want to do some sort of panoramic screenshot. Here's how (brought by Trosh):
Step 1: Open up the .love with your usual method (extract or read .love with whatever program you used to archive your mappack folder).
Step 2:Edit the main.lua file : Change line 38 to:
Step 3: Save the file. run the .love again
This setting should make the game window twice as large, and the game should work accordingly. This allows to see more of the screen in one picture, although it will reduce system performance and makes casual play less enjoyable. Of course, you can change the value to whatever you see fit.
Tileset - If you're using a custom tileset to make this mappack, and only if you really want to release it, you can put an image of your tileset on your thread, in a similar sort of way to screenshots.
Version History - If you haven't made the mappack and finished it in one go, you can go create a version history for every update of your mappack. It gives the impression to others that you're dedicated to your mappack, and it'll be improved constantly. You may also wish to put up download links to outdated versions if you so desire.
Trailers - Now this is for advanced mappack makers. If you can get a decent trailer made, it will really help to show off your mappack, as it combines sound, animation, and anything else you want to throw in there. There are a couple of people in the forums who could help you make a trailer. I won't list them here, because I'm fairly sure they don't want to be bombarded with thousands of requests. Just go search a little.
Help Meeee! - If you're really stuck with an idea or a mechanic, you can post a "Things I Need Help With" section in your thread. Don't worry, the people in this forum aren't jerks, someone will help you (unless you're working on The Gauntlet, then you're screwed for help).
Page Breakers - You can also put in a really thin image of a line across the page, to help divide the sections of text up (I've done it for this thread using the page breakers I used for the Gauntlet). Really, its only purposes are to make your thread look sexy, and to improve readability, so it's not completely necessary.
Resized Windows - Another thing you can do is to resize your Mari0 window dimensions. This is helpful if you want to do some sort of panoramic screenshot. Here's how (brought by Trosh):
Step 1: Open up the .love with your usual method (extract or read .love with whatever program you used to archive your mappack folder).
Step 2:Edit the main.lua file : Change line 38 to:
Code: Select all
width = 50This setting should make the game window twice as large, and the game should work accordingly. This allows to see more of the screen in one picture, although it will reduce system performance and makes casual play less enjoyable. Of course, you can change the value to whatever you see fit.
Well, it looks like that's about it for now. Remember that this is just my opinion, and the most important thing to take away from this is to use your own judgement. If there are any suggestions for other things that should be included, just write a message below, and I'm definitely not giving a tutorial on message writing.
Thank you for reading,
MrCytosine
Thank you for reading,
MrCytosine


